What Are Polyboards (Photography)
- Polyboards (also called poly boards or foam polyboards) are rigid, lightweight panels made from polystyrene (foam), commonly sized around 2400 × 1200 mm (4′×8′) and approximately 50 mm thick.
- One side is painted white (for light bounce), the other black (for negative fill); this dual surface makes them a powerful, low-cost light modifier.
Why Photographers Use Polyboards
- Bounce light: Use the white side to reflect studio or natural light into shadow areas and soften facial features.
- Negative fill: Use the black side to absorb unwanted bounce light and sculpt depth—helping avoid flat lighting in white studio spaces.
- Easy to customize: Paint or tape one side black; most arrive both-sided white, making them versatile and durable.
- Affordable and portable: Widely available in hardware stores, they’re cost-effective and easy to move or store.
How to Set Up Polyboards in Studio
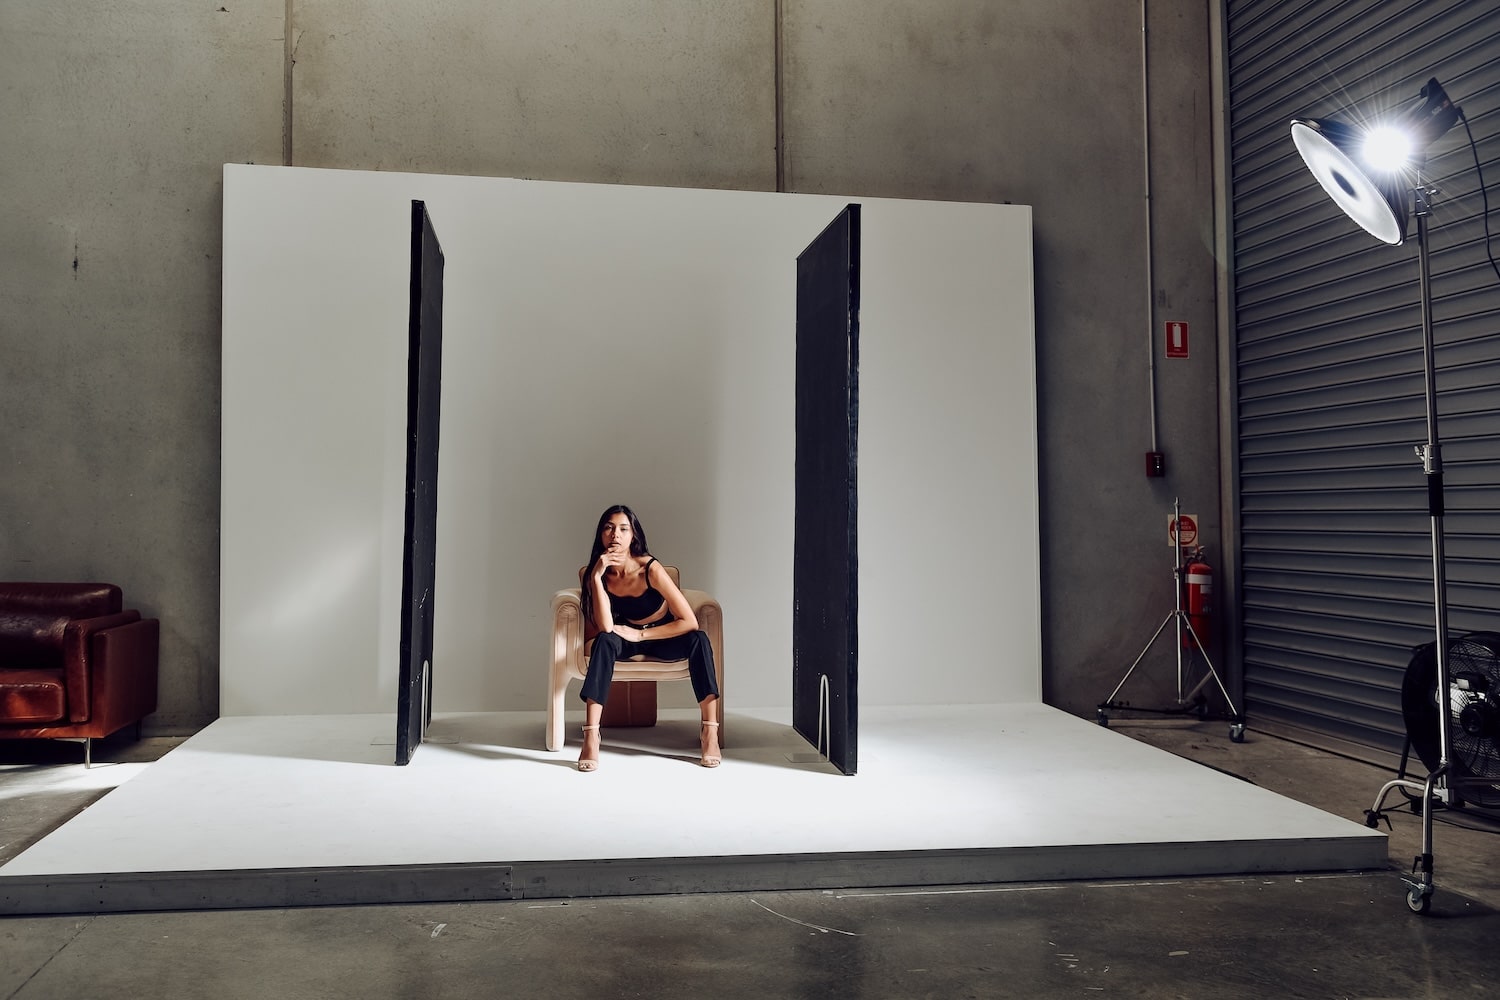
Creating V-Flats
- Tape or hinge two boards A-frame style to form a V-flat: white sides inward for reflection, black sides inward for contrast and shadow control.
Supporting Your Polyboards
- Use purpose-built stands or DIY hacks like bike stands or heavy-duty clamps to keep boards upright—you’ll need bracing to prevent wobble.
- Velcro or hinges between sheets make setup easier if you don’t want permanent fixtures.
Practical Photography Uses
Portraits & Beauty
- Place a white polyboard just out of frame to bounce light under the chin or fill shadows on one side of the face for flattering, soft illumination.
- Use the black side to sculpt shadows and add contrast near the cheek or hairline.
Product & Fashion Shoots
- Use white polyboards behind or beside the product or garment to avoid unwanted reflections and soften transitions.
- Black boards can help isolate shape and create dramatic lighting effects.
DIY Tips & Tricks
- Size & Thickness: Choose at least 50 mm (2″) thick (and ideally 2400 × 1200 mm) so boards remain sturdy when upright.
- Painting: Use flat or low-sheen paint. A grey undercoat improves finish and prevents warping. Most boards need ~2 coats per side (~350–500 mL per coat).
- Handling: Seal edges with tape to guard against dents and wear.
- Packing: Transport flat or hinged; flat stacking risks bending, hinged V-flats store more securely.
Quick Setup Guide
- Position your strobe or continuous light on one side of your subject.
- Set a white polyboard on the opposite side at about waist/chin height angled toward the subject to fill shadows.
- Black polyboard placement: Where you want deeper contrast—place black inward to block light.
- Capture a test shot, then adjust board position or angle to refine shadow and highlight distribution.
Beginner Pitfalls to Avoid
- Mixing software references—only focus on photography use.
- Over-thin boards (<50 mm)—leads to sagging or collapse.
- Skipping reflector/clamp support—unstable boards distract and compromise safety.
- Using glossy paint—reflective finishes bounce unintended glare.
Where to Buy or Hire Polyboards in Australia
- Foamboards Australia: Foldable V-flats with dual-color surfaces.
- Lumoz (Melbourne): Offers thick polystyrene boards (~40–50 mm).
- Camera Hire Australia: Rent polyboards for short-term shoots.
Wrap-Up & What to Do Next
In summary, polyboards are an affordable, flexible, and powerful tool for shaping studio light—whether you're filling shadows with white bounce or sculpting contrast with black negative fill. We’ve covered:
- What polyboards are and why they matter in portrait, fashion, and product photography
- How to set them up (including sturdy V‑flats and reflector-style placement)
- Practical shooting tips and easy DIY hacks for stability and paint finish
This post ensures you’re working with the right materials, setup techniques, and creative control—nothing extra, no confusion.
So now it's your turn…
Your Next Move
- Grab a pair of 50 mm polyboards and play with one-light setups, creating soft bounce or dramatic fill.
- Experiment with positioning a white board under the chin and a black panel for contrast—see how subtle shifts change your portrait’s mood.
- Want help designing your own sturdy polyboard stand or visual cheatsheet? I’ve got you covered.
🚀 Ready to Take Your Studio Lighting Further?
Check out our in-depth guide on one-light beauty portrait setups—perfect if you want to build on what you've learned here. And if you’re shooting products or fashion soon, explore our post on using colour-painted polyboards as custom backdrops.
Explore One-Light Beauty Portrait Setup
Feel free to leave a comment below or reach out if you'd like a free PDF diagram of setup angles and light positioning. You're building real studio skills every time you shoot—keep going!


.JPG)


-min.jpg)

