
Lighting transforms the look and feel of every photo. Whether you’re shooting portraits, fashion, products, or creative projects, understanding how to shape light gives you full control over your outcome.
-min.jpg)
Lighting can feel overwhelming when you're starting out, but the fundamentals stay the same no matter what gear you’re using. Understanding where to place your light and how it shapes your subject is the foundation of every great image. Once you get the basics right, everything else becomes easier.
See our resources below to learn to master lighting in and out of our studio.

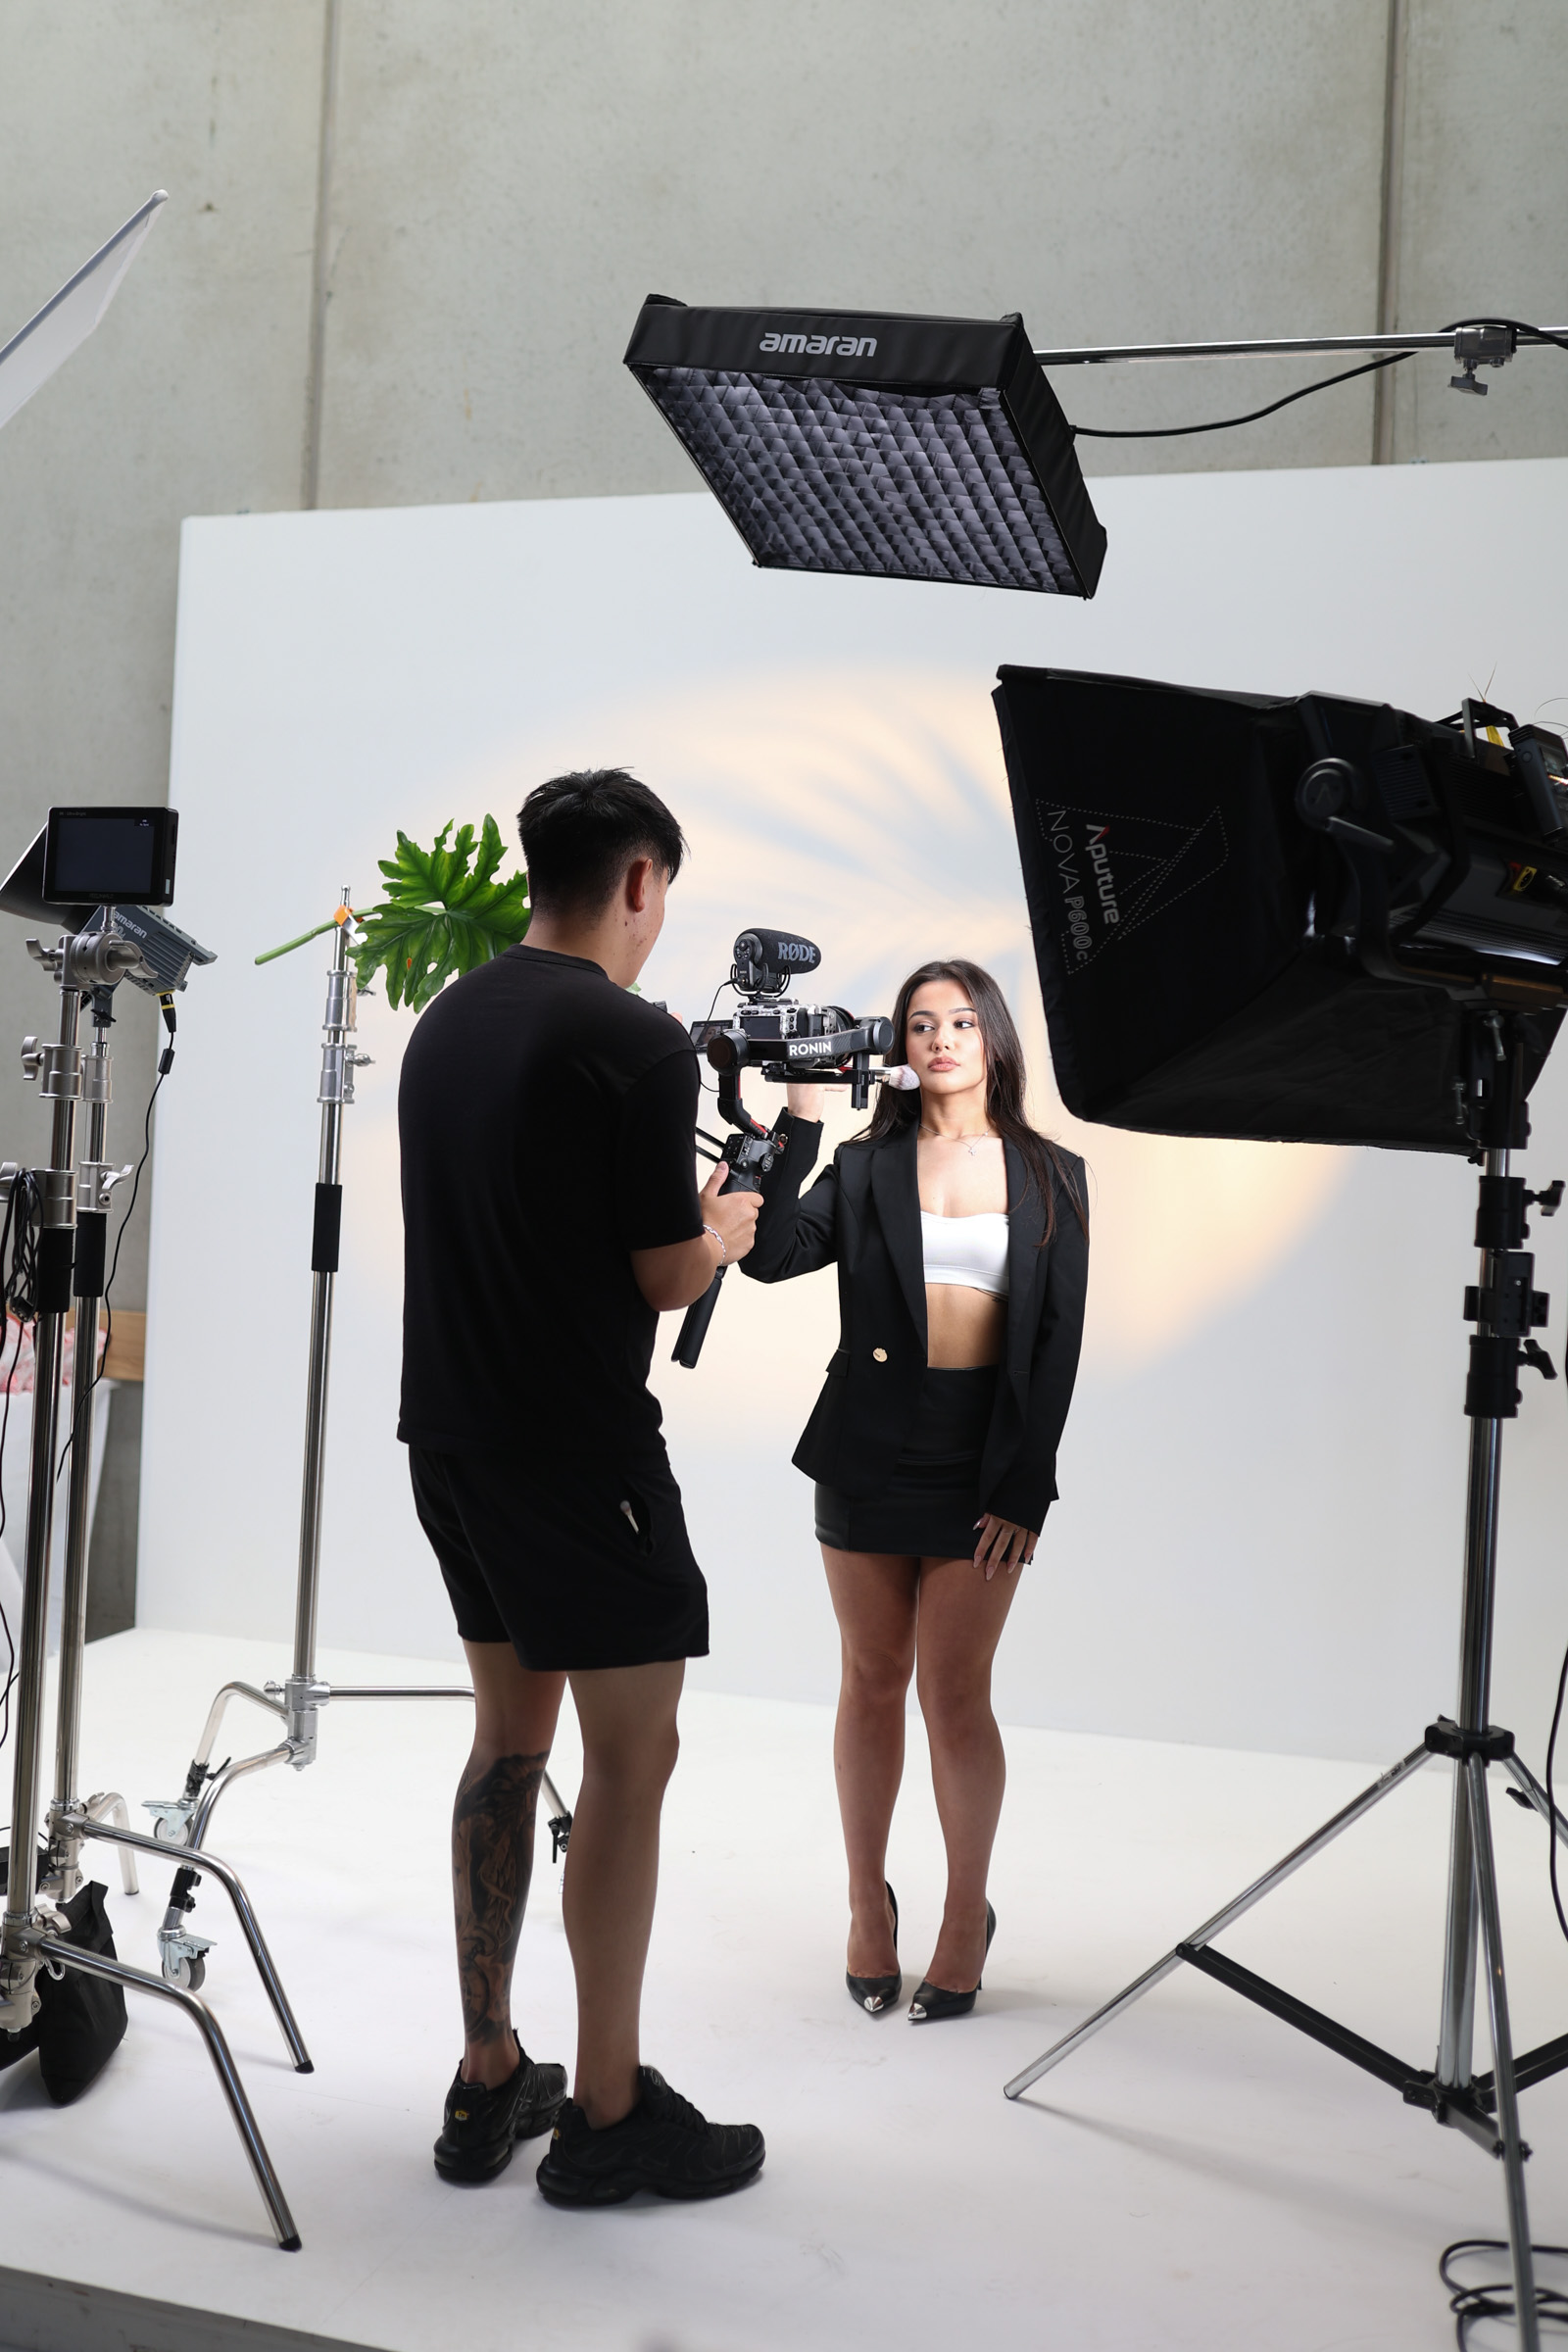

Lighting options at Bohemia Bay Studio give photographers the flexibility to achieve any look they imagine. We offer three primary lighting types: natural light, continuous lights, and strobes. Each has unique qualities that affect mood, texture, and exposure. By understanding these options, you can choose the perfect light for every subject and style - or mix them creatively for more dynamic results. Below, you’ll learn what each type does best and where to set them up in our studio.
-min.jpg)

Daylight through windows provide soft, natural illumination in the studio. Our large windows can yield flattering light for portraits, but it varies by time and weather.
Our studio gets beautiful daylight throughout the day. We also have two large garage doors that flood the space with natural light when opened.
These are lights (e.g. LED panels, flurescent bulbs, tungsten) that stay on continuously. They let you see exactly how shadows and highlights fall in real time, making them beginner-friendly. Continuous lights are great for video and situations needing steady light.
We offer two continuous LED lights. These are great for beginners because you can see exactly how the light behaves before you take the shot.


Studio strobes fire a powerful burst of light when you take a photo. They freeze motion and achieve very bright, clean exposures - ideal for dynamic or high-speed shoots. Strobes come in pack-and-head systems or monolights. They can overpower ambient light and produce sharp, high-contrast images.
We also provide two professional strobes - perfect for controlled, commercial-style shoots.
One-light setups use a single strobe light as the key source for your professional studio light setups. It's one of the simplest and most effective ways to create professional-looking portraits in the studio. at Bohemia Bay Studio, we've made it essy to recreate classic one-light looks using our mapped floor stations, labelled A-H.
Strobes give you power and control. With one light, you can master the fundamentals of shadow, contrast, and direction. Beginners can clearly see how small shifts in placement change the whole mood of an image. One strobe also delivers crisp, clean light with plenty of flexibility.
You'll find visual guides and lighting diagrams for photographers for each lighting style right in the studio. Our mapped layout shows exactly where to place your subject and light, so you can focus on experimenting and creating - rather than guessing.
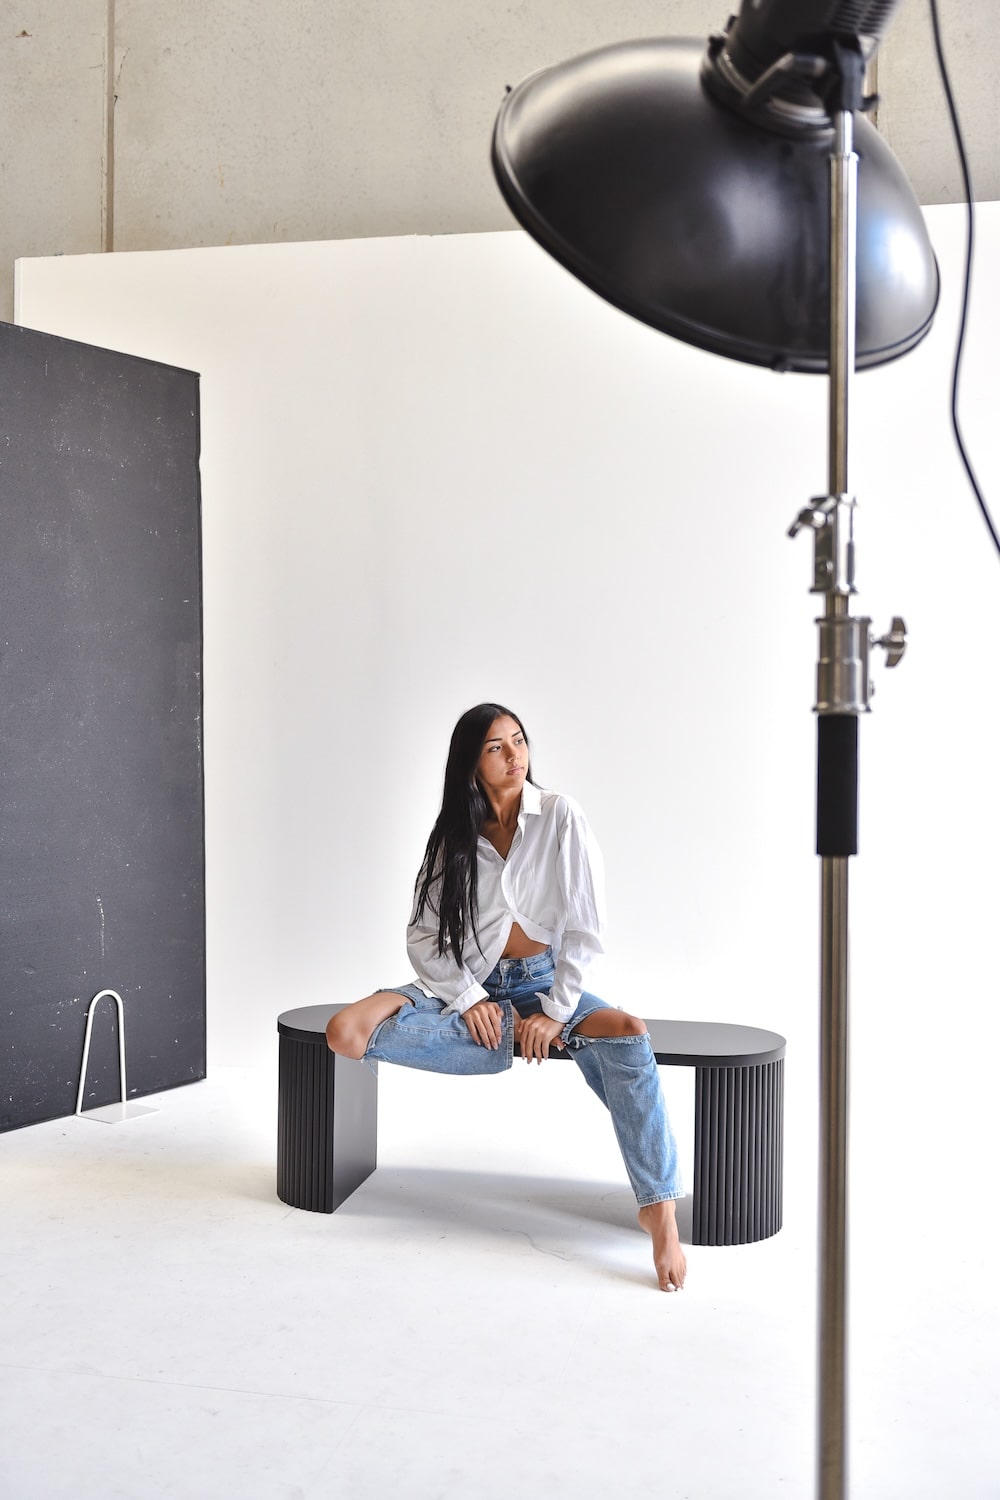
This setup is one of our favorite portrait lighting techniques for creating a soft, flattering beauty look. The process is simple: you'll use a single strobe with a large octabox, a stand, and two V-flats. The light is positioned directly in front of the model, slightly above eye level, while the V-flats are placed on either side to control shadows. Experiment with the white sides of both V-Flats facing in, or turn one to create some shadow and depth on one side.
This one-light setup creates a beautiful, diffused form of light that flatters the face with minimal shadows, much like a model standing by a window in the soft morning light. The result is a warm, inviting image that enhances natural features, making it perfect for beauty shots, headshots, and e-commerce.

This simple setup is perfect for adding a moody, cinematic feel to your portraits. The process involves using a single strobe with a large softbox positioned at a 45-degree angle from your model, slightly above eye level. A V-flat is then used on the shadow side, with the dark side facing the model to enhance contrast and deepen the shadows.
This one-light dramatic setup carves out details with bold highlights and deep shadows, giving your images an intense, expressive quality. The powerful contrast emphasises facial features and creates a striking, unforgettable portrait. It's a fantastic choice for artistic, editorial, or personal branding shots that demand attention.
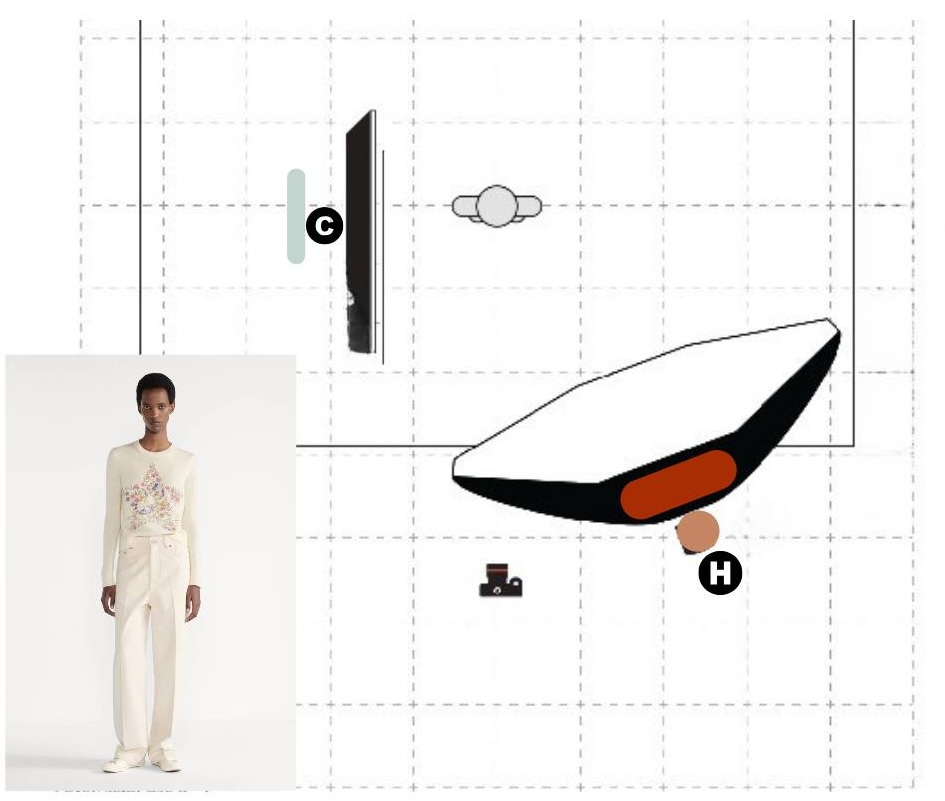
This setup is ideal for creating sleek, professional full-body shots for e-commerce. The process involves a single strobe with a large softbox placed at a 45-degree angle from your subject, slightly above eye level. A V-flat is then used on the shadow side to add depth and refine the shadows.
This one-light setup adds a professional edge to full-body product shots by creating subtle highlights and shadows that emphasize the details and form of the product. The result is a clean, polished image that exudes elegance and detail, perfect for luxury and high-end fashion brands looking to make a lasting impression.
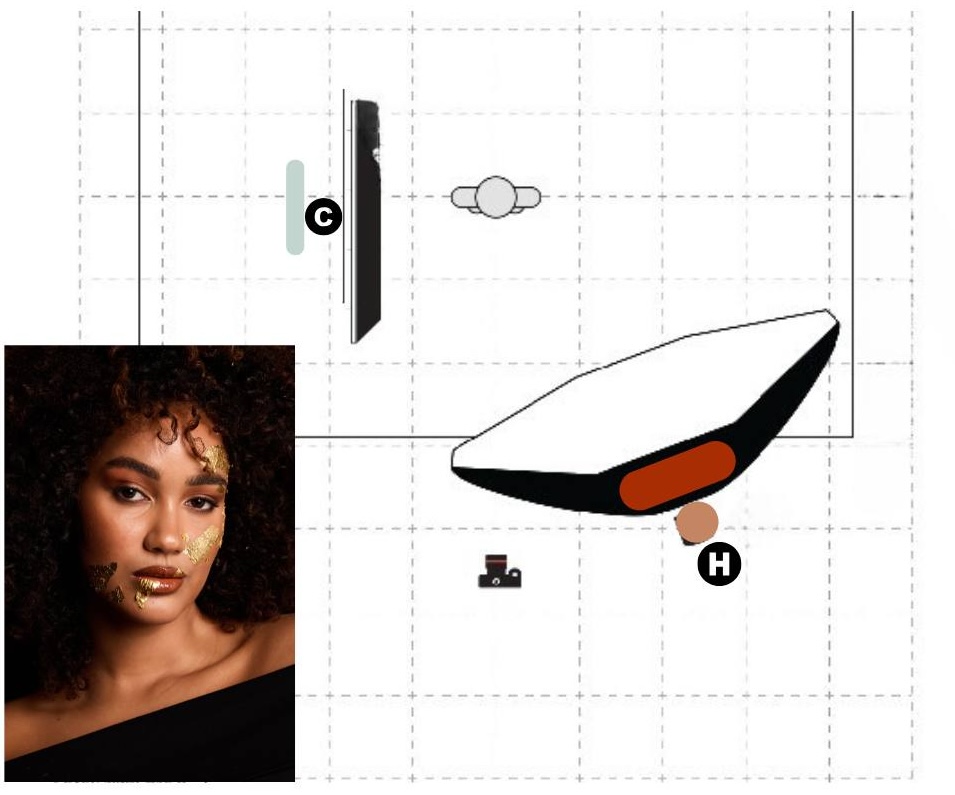
This is a high-contrast setup that creates a sense of drama and mystery. The process is simple: you position a single light at a 90-degree angle to your subject, which illuminates one side of their face while leaving the other in deep shadow. This creates a bold division, or "split," down the centre of the face.
This one-light setup creates a powerful, high-contrast portrait that is perfect for moody and expressive shots. It's a classic look for musicians, artists, or anyone who wants a more editorial, film-noir feel.
This setup is a classic for a reason, creating a sophisticated and timeless portrait. The process involves placing a single light at a 45-degree angle to your subject and slightly above eye level. The key is to have the light create a small, inverted triangle of light on the cheek opposite the light source, which is the signature of this style.
Rembrandt lighting adds a sense of dimension and depth to the face. The small triangle of light adds a spark to the eye on the shadow side, giving the image a sense of intimacy and drama, making it a powerful choice for professional portraits and personal branding.
Two-light setups build on the fundamentals of single strobe lighting by adding a second light - usually for fill, background, or rim light. It gives you more creative control without overcomplicating your shoot. At Bohemia Bay Studio, our labelled A–H floor stations make it easy to replicate reliable two-light setups with consistency and speed.
Two strobes allow you to balance light creatively. While your main light shapes the subject, the second can reduce shadows, separate your subject from the background, or create more depth. It's perfect for portraits, fashion, or product work where you want polish without fuss.
In the studio, you’ll find visual lighting diagrams for each look, designed to take the guesswork out of setup. Just match your lights and subject to the layout, then tweak to suit your style. You’ll have a pro look, without overthinking the technicals.
This is one of the most classic studio lighting setups. Use your key light as the main source, typically a strobe with a softbox or umbrella and position it at about 45° to your subject. Your fill light goes on the opposite side, set to lower power, and can be modified with a reflector or another softbox. This evens out shadows and reduces contrast without flattening the image.
This setup delivers a natural, well-lit look that's flattering and true-to-life. It maintains shape and dimension while gently filling in shadows. Great for headshots, corporate portraits, and brand photography when you want clarity and approachability.

Position two strobes on either side of the subject, both angled inward at 45°. You can experiment with equal power for a symmetrical, edgy look, or lower one side to add directional contrast. Modifiers like strip softboxes or umbrellas work well here to control spill.
Cross lighting gives a bold, high-contrast look with strong shape and shadow. It’s great for stylised fashion shoots, fitness portraits, or editorial looks where edge and attitude matter. You’ll get dramatic contours and a sense of movement in the frame.

Set your key light in the usual 45° position toward your subject. Add a second strobe aimed directly at the backdrop from behind or just to the side of your subject. This background light can be modified with a reflector dish or barn doors to control light spread.
This setup keeps your subject well-lit while giving the background a clean, intentional glow. It’s ideal for white-on-white or coloured backdrop looks that need separation. Think clean e-commerce shots, catalogue fashion, or modern brand portraits.

Setting up the studio with constant lights is a great alternative to strobes if you're also filming videos, or not quite ready to make the. jump.
They allow you to test shadows in real time. The setups will mimic that of the strobe setups.
Constant Lights allow you to see the end result in real time. Whilst strobes require test shots, and small adjustments, constant lights let you see and change the result right in front of your eyes. Do note that running constant lights on your model may get hot, and you'll need to change the ISO and aperature of your camera to let more light in as they're not as powerful as strobes.
You'll find visual guides and lighting diagrams for photographers for each lighting style right in the studio. Our mapped layout shows exactly where to place your subject and light, so you can focus on experimenting and creating - rather than guessing.
Place one light as your key light at ~45° from your subject, above eye level. Place a v-flat on the shadow side of your subject to either increase or decrease the depth of shadow for a more professional look.
This one-light setup creates a beautiful, diffused form of light that flatters the face with minimal shadows, much like a model standing by a window in the soft morning light. The result is a warm, inviting image that enhances natural features, making it perfect for beauty shots, headshots, and e-commerce.
Use one light as your key in front, and the second light behind the subject, aimed back toward them at ~45°, to create a rim or kicker light that separates them from the background. Best for fashion, fitness, or dramatic branding shots.
This two constant light setup carves out details with bold highlights and deep shadows, giving your images an intense, expressive quality. The powerful contrast emphasises facial features and creates a striking, unforgettable portrait. It's a fantastic choice for artistic, editorial, or personal branding shots that demand attention.

Natural Light is often thought of as the most beautiful, but it's still important to have an understanding of intensity and direction. A soft, south facing window light creates a very different look to a harsh northern light.
We suggest relying on natural light with caution for eCommerce images as the quality and direction of light changes so often.
It's simple and often the first type of light photographers learn to harness. When used correctly, it can create beautifully soft, or interesting photos. Our studio does have ample light to harness with both a large south facing garage door, and smaller north facing windows.
You'll find visual guides and lighting diagrams for photographers for each lighting style right in the studio. Our mapped layout shows exactly where to place your subject and light, so you can focus on experimenting and creating - rather than guessing.
The large south-facing 5m roller door lets in beautiful soft, diffused light all day long.It’s great for clean portraits, lifestyle content, or soft product photos.Best to shoot facing into the light for a soft, even glow, or turn the subject slightly for some light shaping.Because the light is so even, it works well without reflectors—though you can use a white board or V-flat to bounce in some fill if needed.Best for: personal branding, soft product flat-lays, clean lifestyle portraits.
This one-light setup creates a beautiful, diffused form of light that flatters the face with minimal shadows, much like a model standing by a window in the soft morning light. The result is a warm, inviting image that enhances natural features, making it perfect for beauty shots, headshots, and e-commerce.
The northern garage door brings in stronger light. When it's open, you'll get punchy, directional light—great for contrast and drama.We’ve placed plants near this door to let you play with shadows—creating leaf textures or dappled light on skin or product surfaces.You can also pull back from the door and shoot in the space just beyond the hard edge of light for a clean, directional look without harsh contrast.Best for: dramatic portraits, creative editorial, textured flat-lays, playing with shape and shadow.
This one-light dramatic setup carves out details with bold highlights and deep shadows, giving your images an intense, expressive quality. The powerful contrast emphasises facial features and creates a striking, unforgettable portrait. It's a fantastic choice for artistic, editorial, or personal branding shots that demand attention.
